Lenovo E73 Specifications Page 111
- Page / 186
- Table of contents
- TROUBLESHOOTING
- BOOKMARKS
- ThinkCentreE73 1
- HardwareMaintenanceManual 1
- FourthEdition(December2014) 2
- Contents 3
- Chapter1.Aboutthismanual 5
- Chapter2.Safetyinformation 7
- Voltage-selectionswitch 9
- Safetyinspectionguide 9
- Groundingrequirements 10
- Chapter2.Safetyinformation7 11
- .Safetyinformation9 13
- Chapter2.Safetyinformation11 15
- .Safetyinformation13 17
- .Safetyinformation15 19
- Chapter2.Safetyinformation17 21
- ≥18kg≥32kg≥55kg 23
- .Safetyinformation21 25
- Chapter2.Safetyinformation25 29
- Chapter3.Generalinformation 33
- Lenovoprograms 34
- Chapter3.Generalinformation31 35
- LenovoSupportWebsite 36
- Chapter4.Generalcheckout 37
- Basictroubleshooting 39
- Troubleshootingprocedure 40
- Troubleshooting 41
- Audioproblems 41
- NoaudioinWindows 42
- CDproblems 43
- DVDproblems 44
- Intermittentproblems 45
- Harddiskdriveproblems 45
- Monitorproblems 48
- Networkingproblems 49
- AwirelessLANproblem 51
- Bluetoothproblem 51
- Optionproblems 52
- Performanceandlockupproblems 52
- Printerproblems 54
- Serialportproblems 55
- Softwareproblems 55
- USBproblems 56
- Diagnostics 57
- LenovoSolutionCenter 57
- UEFIdiagnosticprogram 57
- Viewingandchangingsettings 59
- Usingpasswords 59
- Passwordconsiderations 60
- Power-OnPassword 60
- AdministratorPassword 60
- HardDiskPassword 60
- Enablingordisablingadevice 61
- Selectingastartupdevice 62
- EnablingErPLPScompliancemode 62
- ExitingtheSetupUtilityprogram 63
- Chapter7.Symptom-to-FRUindex 65
- POSTerrorcodes 66
- .Symptom-to-FRUindex63 67
- Miscellaneouserrormessages 68
- Undeterminedproblems 69
- Chapter8.Locations 71
- LocatingmajorFRUsandCRUs 73
- Figure3.Componentlocations 74
- LookingupFRUinformation 75
- Locatingpartsonthesystemboard 76
- Locatinginternaldrives 77
- .Locations75 79
- .Locations77 81
- Installingexternaloptions 85
- Installingorreplacinghardware 85
- Replacingtherearfanassembly 93
- Installingthesolid-statedrive 98
- Replacingtheslimcardreader 101
- Replacingthethermalsensor 107
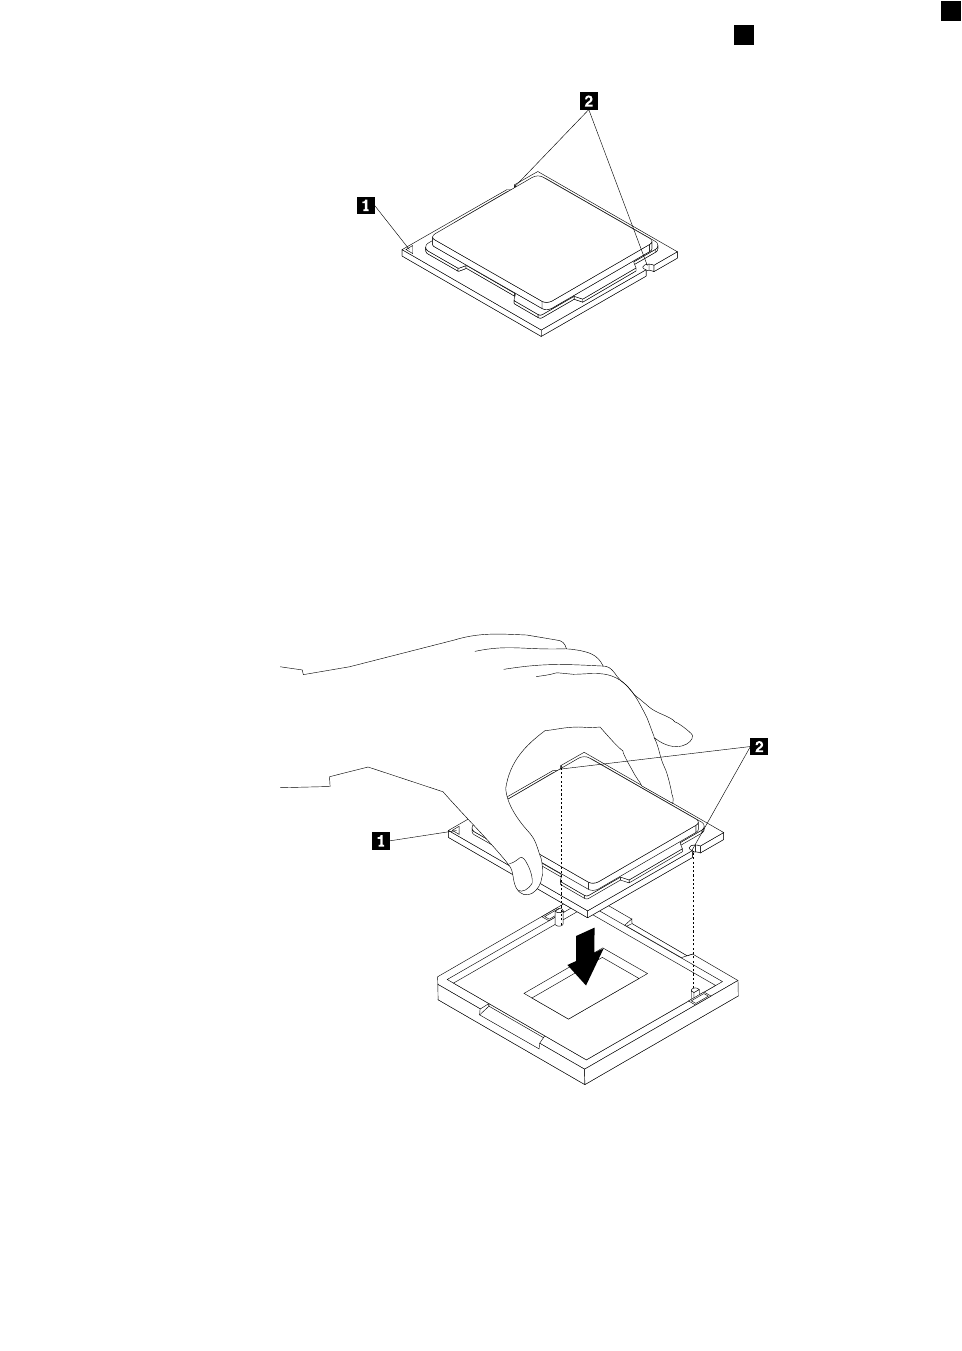
- Replacingthemicroprocessor 109
- 2onthemicroprocessor 111
- Replacingthesystemboard 112
- ReplacingtheWi-Fiunits 115
- RemovingtheWi-Ficardmodule 117
- InstallingtheWi-Fiunits 118
- InstallingtherearWi-Fiantenna 121
- RemovingtherearWi-Fiantenna 121
- Replacingthekeyboardormouse 124
- Completingthepartsreplacement 125
- Obtainingdevicedrivers 126
- 10BF,and10BG) 127
- Removingthecomputercover 128
- 1inwardandpivotthedrivebay 131
- 1asshownto 132
- Replacingthebattery 134
- Replacingtheharddiskdrive 135
- Replacingtheopticaldrive 137
- Replacingthesolid-statedrive 143
- Replacingthesystemfanassembly 162
- RemovingtheWi-Fiadaptercard 166
- InstallingthefrontWiFiantenna 172
- RemovingthefrontWi-Fiantenna 173
- ©CopyrightLenovo2013,2014 177
- Powermanagement 180
- AutomaticPower-onfeatures 180
- AppendixA.Notices 181
- Televisionoutputnotice 182
- EuropeanconformanceCEmark 182
- Trademarks 182
Related products and manuals for Mini PCs Lenovo E73
 (154 pages)
(21 pages)
(152 pages)
(136 pages)
(160 pages)
(37 pages)
(134 pages)
(57 pages)
(154 pages)
(168 pages)
(4 pages)
(158 pages)
(128 pages)
(150 pages)
(63 pages)
(180 pages)
(43 pages)
(146 pages)
(154 pages)
(21 pages)
(152 pages)
(136 pages)
(160 pages)
(37 pages)
(134 pages)
(57 pages)
(154 pages)
(168 pages)
(4 pages)
(158 pages)
(128 pages)
(150 pages)
(63 pages)
(180 pages)
(43 pages)
(146 pages)
© 2020, manymanuals.com. All rights reserved. | 0.484 s |
 Manymanuals.com
 Manymanuals.de
 Manymanuals.fr
 Manymanuals.it
 Manymanuals.pl
 Manymanuals.cz
 Manymanuals.es
 Manymanuals-pt.com
Comments to this Manuals